颜色分割
import cv2 as cv
import numpy as np
src = cv.imread("./bird.png")
blur = cv.blur(src, (5, 5))     # 滤波
blur0 = cv.medianBlur(blur, 5)
blur1 = cv.GaussianBlur(blur0, (5, 5), 0)
blur2 = cv.bilateralFilter(blur1, 9, 75, 75)

hsv = cv.cvtColor(blur2, cv.COLOR_BGR2HSV)  # 转换颜色空间
low_blue = np.array([55, 0, 0])
high_blue = np.array([118, 255, 255])
mask = cv.inRange(hsv, low_blue, high_blue)
res = cv.bitwise_and(src, src, mask=mask)
cv.imwrite('bird_1.png', res)
cv.namedWindow("input", cv.WINDOW_AUTOSIZE)
cv.imshow("input", res)
cv.waitKey(0)
cv.destroyAllWindows()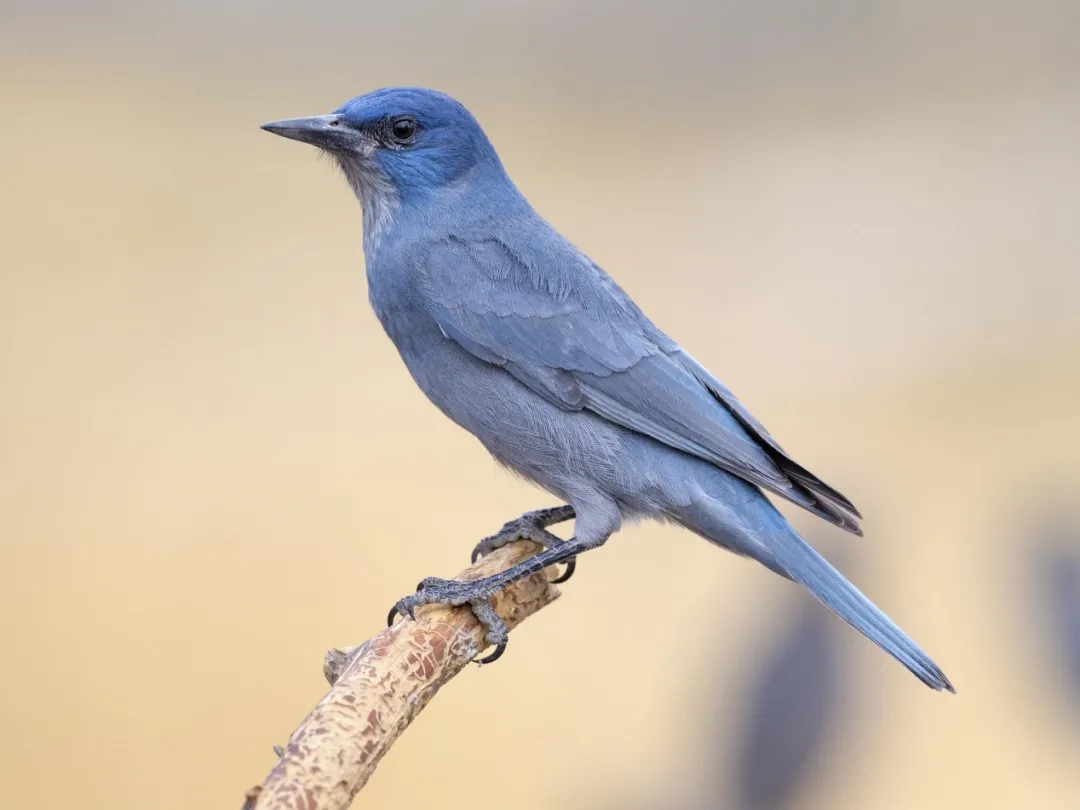
原始图像
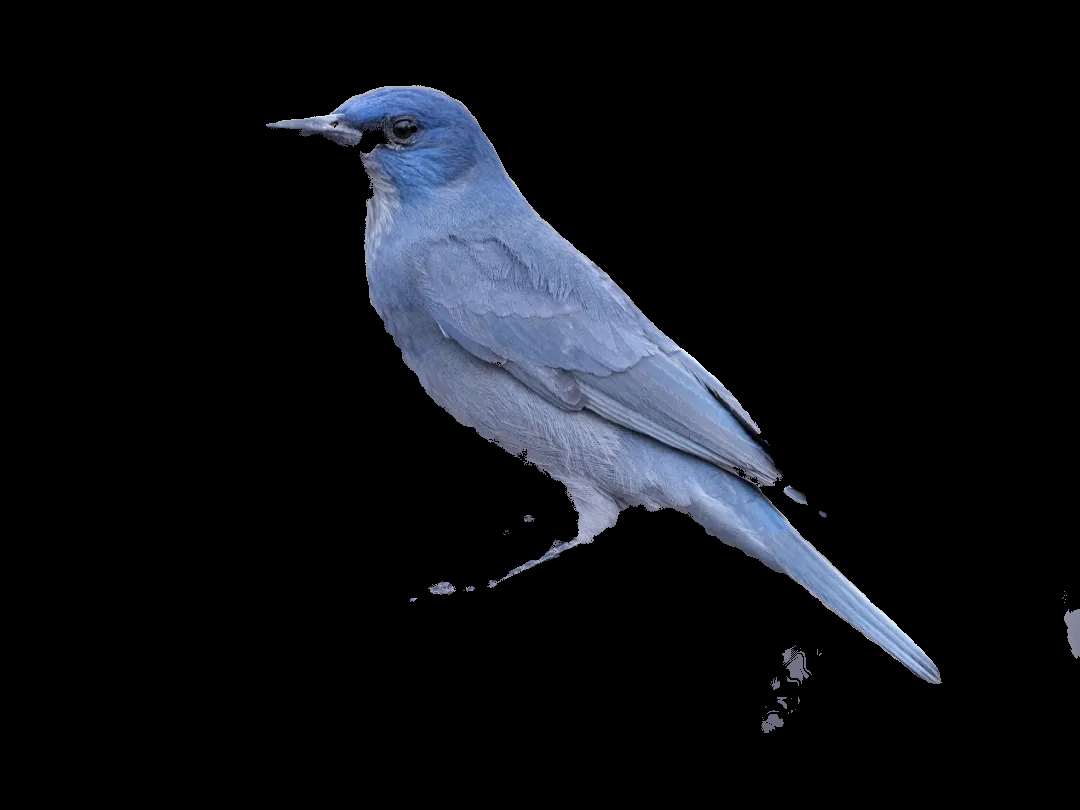
分割图像
仿射变换
import numpy as np
import cv2 as cv
import matplotlib.pyplot as plt


img = cv.imread('1.png')
print(img.shape)
rows, cols = img.shape[:2]
print(rows)
print(cols)
pts1 = np.float32([[50, 50], [200, 50], [50, 200]])
pts2 = np.float32([[100, 100], [200, 50], [100, 250]])
M = cv.getAffineTransform(pts1, pts2)
dst = cv.warpAffine(img, M, (cols, rows))

fig, axes = plt.subplots(nrows=1, ncols=2, figsize=(10, 8), dpi=100)
axes[0].imshow(img[:, :, ::-1])
axes[0].set_title('init')
axes[1].imshow(dst[:, :, ::-1])
axes[1].set_title('transform')
plt.show()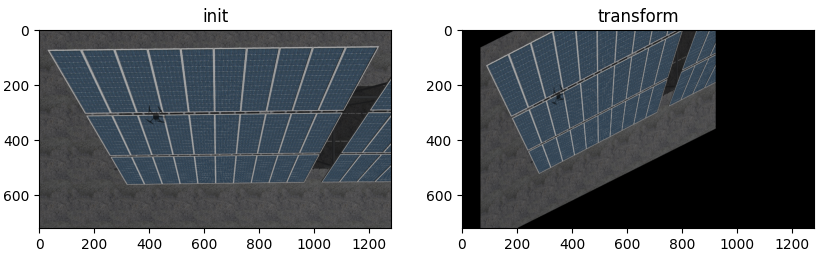
仿射变换
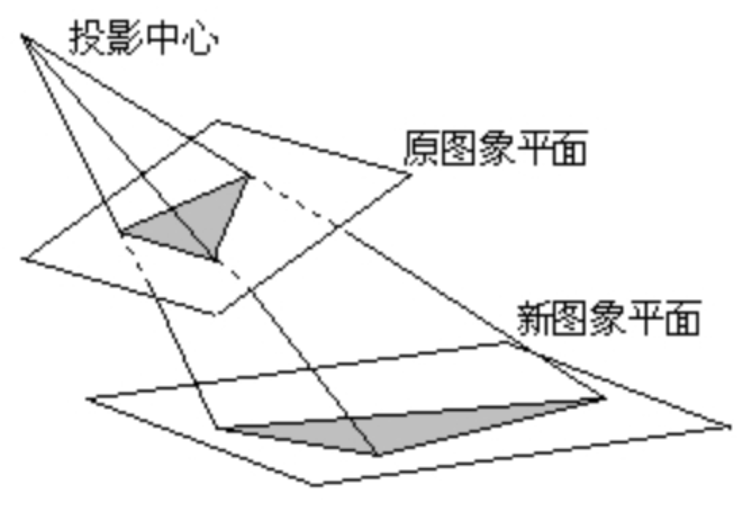
透射变换
透射变换是视角变化的结果,是指利用透视中心、像点、目标点三点共线的条件,按透视旋转定律使承影面(透视面)绕迹线(透视轴)旋转某一角度,破坏原有的投影光线束,仍能保持承影面上投影几何图形不变的变换。
C++
Mat M = getPerspectiveTransform(pts, pt2);
// 由两幅图像的对应4个点获得变换矩阵

warpPerspective(src, dst, M, Size(dst_width, dst_height));
// src: 源图像
// dst: 目标图像
// M: 变换矩阵
// Size: 变换后的图像大小#include <iostream>
#include <opencv2/opencv.hpp>
using namespace cv;
using namespace std;
Mat src, mat, dst;
int pts_count = 0;
Point2f pts[4]; // 需要指定4个点构造矩阵
int dst_width = 800;
int dst_height = 600;
// 鼠标双击事件,确定需要变换的区域
static void _mouse_double_click_handler(int nEvt, int x, int y, int flags, void* p) {
switch (nEvt)
{
case EVENT_LBUTTONDBLCLK:
if (pts_count < 4) {
pts[pts_count] = Point2f(x, y);
pts_count++;
circle(mat, Point(x, y), 5, Scalar(0, 0, 255), -1, 8);
imshow("src", mat);
}
break;
default:
break;
}
if (pts_count == 4) {
Point2f pt2[4];
pt2[0] = Point2f(0, 0);
pt2[1] = Point2f(dst_width, 0);
pt2[2] = Point2f(dst_width, dst_height);
pt2[3] = Point2f(0, dst_height);
Mat M = getPerspectiveTransform(pts, pt2);
warpPerspective(src, dst, M, Size(dst_width, dst_height));
imshow("dst", dst);
imwrite("transform.png", dst);
}
}
int main(int artc, char** argv) {
src = imread("1.png", IMREAD_COLOR);
if (src.empty()) {
cout << "can't find picture" << endl;
return -1;
}
namedWindow("src");
setMouseCallback("src", _mouse_double_click_handler);
mat = src.clone();
imshow("src", mat);
waitKey(0);
return 0;
}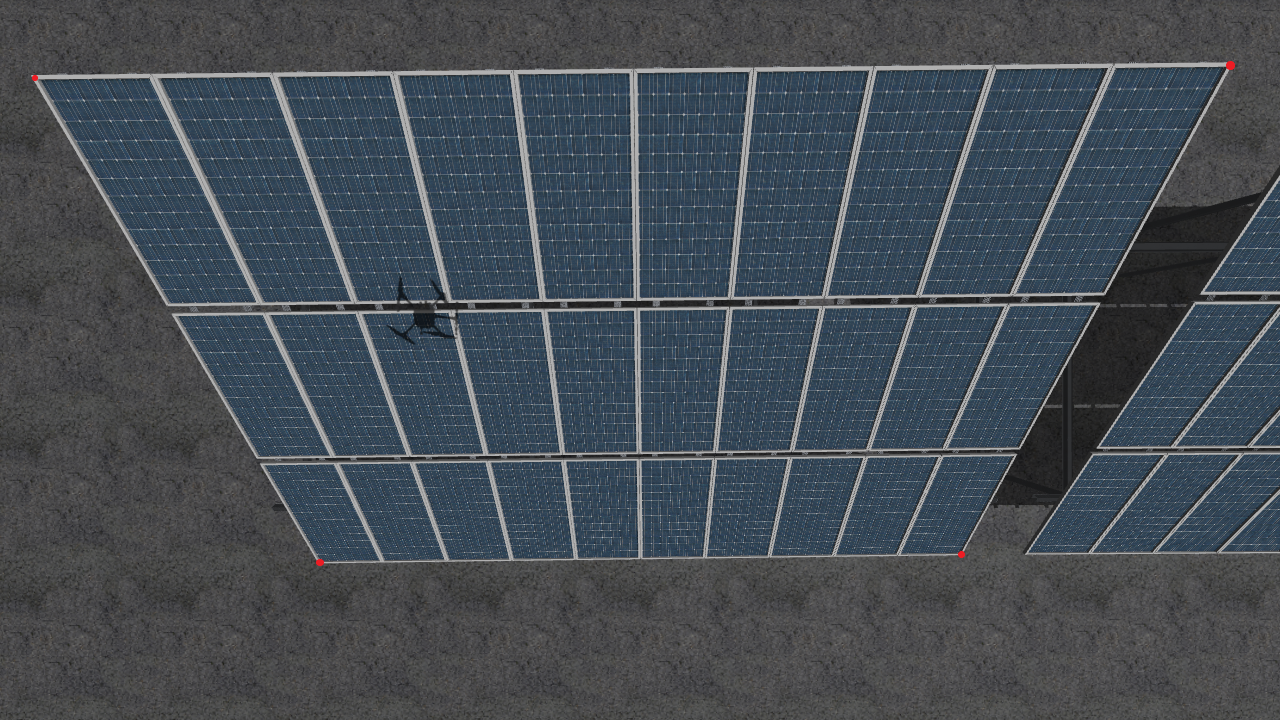
原始图像
仿射图像
python
import numpy as np
import cv2 as cv
import matplotlib.pyplot as plt

dst_width = 1200
dst_height = 900
img = cv.imread('1.png')
print(img.shape)
rows, cols = img.shape[:2]
print(rows)
print(cols)
pts1 = np.float32([[33, 74], [1238, 60], [963, 555], [318, 563]])
pts2 = np.float32([[0, 0], [dst_width, 0], [dst_width, dst_height], [0, dst_height]])
M = cv.getPerspectiveTransform(pts1, pts2)
dst = cv.warpPerspective(img, M, (dst_width, dst_height))
cv.imwrite('perspective.png', dst)
fig, axes = plt.subplots(nrows=1, ncols=2, figsize=(10, 8), dpi=100)
axes[0].imshow(img[:, :, ::-1])
axes[0].set_title('init')
axes[1].imshow(dst[:, :, ::-1])
axes[1].set_title('transform')
plt.show()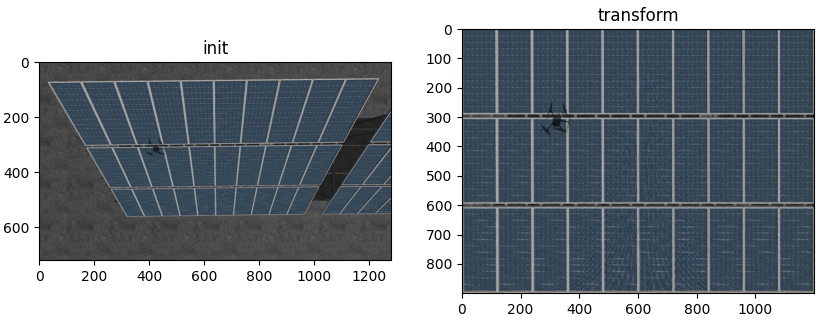
仿射变换
开运算
import numpy as np
import cv2 as cv
import matplotlib.pyplot as plt

src = cv.imread('mask2.png')
img = cv.cvtColor(src, cv.COLOR_BGR2GRAY)
kernel = np.ones((10, 10), np.int8)
kernel2 = np.ones((25, 25), np.int8)

erosion = cv.erode(img, kernel)
dilate = cv.dilate(erosion, kernel2)


plt.figure(1)
plt.imshow(src[:, :, ::-1])
plt.figure(2)
plt.imshow(dilate, cmap="binary")
plt.show()
开运算
边缘检测
import numpy as np
import cv2 as cv
import matplotlib.pyplot as plt

src = cv.imread('open.png', cv.IMREAD_GRAYSCALE)
print(src.shape)
low = 100
high = 200
canny = cv.Canny(src, low, high)
fig, axes = plt.subplots(nrows=1, ncols=2, figsize=(10, 8), dpi=100)
axes[0].imshow(src, cmap="binary")
axes[0].set_title('init')
axes[1].imshow(canny, cmap="binary")
axes[1].set_title('Canny')
plt.show()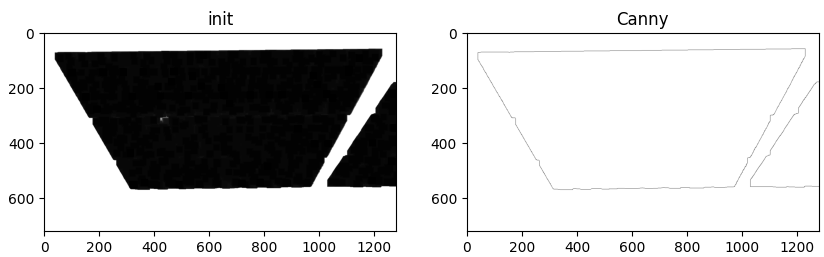
边缘检测
绘制轮廓
cv.drawContours(image, contours, contourIdx=1, color=(255, 0, 0), thickness=5)
# image: 在哪个图像上画
# contours: 轮廓集合
# contourIdx: 绘制哪个轮廓,-1表示所有
# color: 颜色
# thickness: 线宽
import cv2 as cv
from matplotlib import pyplot as plt
import numpy as np
image = cv.imread("images/open.png")
print(image.shape)
blur = cv.blur(image, (5, 5))
gray = cv.cvtColor(blur, cv.COLOR_BGR2GRAY)
# 二值化
ret, binary = cv.threshold(gray, 20, 100, cv.THRESH_BINARY_INV)
contours, hierarchy = cv.findContours(binary, cv.RETR_TREE, cv.CHAIN_APPROX_SIMPLE)
print('len:', len(contours)) # 2
cv.drawContours(image, contours, contourIdx=1, color=(255, 0, 0), thickness=5)
# 选择符合要求的轮廓进行绘制
# for i in range(len(contours)):
# cnt = contours[i]
# perimeter = cv.arcLength(cnt, True) # 轮廓周长
# if 3000 < perimeter < 3300:
# cv.drawContours(image, [cnt], -1, (255, 0, 0), 5)
fig, axes = plt.subplots(nrows=1, ncols=2, figsize=(10, 8), dpi=100)
axes[0].imshow(binary, cmap="binary")
axes[0].set_title('bibary')
axes[1].imshow(image, cmap="binary")
axes[1].set_title('contours')
plt.show()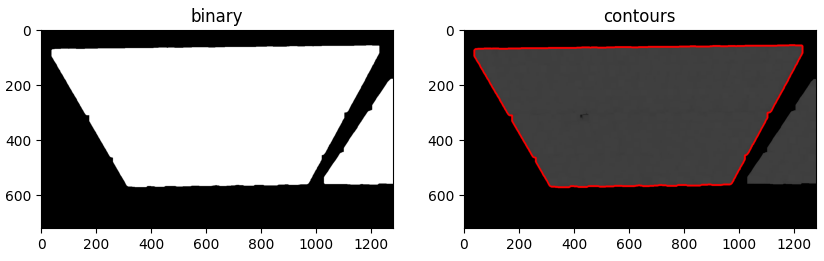
绘制轮廓